Friday, 24 June 2011

Garden Design Ideas - Small Shallow Garden - Update 3

The build for this small, shallow garden in Warfield (Bracknell), Berkshire is nearly at an end. The main structure of the garden is in place. All the retaining walls are built, the pergola is finished and the paving is going down.


The garden has been divided into distinct areas without using solid physical barriers. One of the ways this has been achieved is by creating two spaces that are enclosed by curved sections of low wall which have been finished with slate cladding which looks stunning. This gives them their own character, a sense of enclosure and the feeling that they are for different purposes. In short, open plan rooms.


One of these curved rooms is a seating area with a chunky pergola. I'm sure I've said it before and I will almost certainly say it again, but when you're designing a small garden which is overlooked you need to focus attention inside the garden. One sure way of achieving this is by building bold, architectural structures. In this garden the pergola serves this purpose and I'm delighted with how it's turned out. Greg from Tranckle Landscapes is a master of pergola construction and has done a brilliant job considering he's had to work with straight sections of wood round a curved wall...


The other curved wall encloses a piece of lawn into which will be set a stainless steel water feature. It is the sort of area where you can sit on a rug with a picnic and a book without the feeling that all the neighbours are peeking at you. The curved walls also help focus the eye inside the garden.


Even though space is fairly limited, there are two other sitting/dining areas. One of them I've designated the breakfast terrace, it catches the morning sun and is a short walk from the back door - an ideal place to take your morning coffee. The other is just outside the conservatory doors. It will house a couple of loungers from which the person lounging can watch the cook prepare food on the barbeque. Speaking of the barbeque, it has it's own designated enclosure with two peripheral cupboards and slate worktops. A mini outdoor kitchen.


I'm almost through choosing the paint colour. I want a bold colour to contrast with the charcoal slate cladding and bring some vibrancy into the garden. It's all too easy to fall back on white, but I love colour and a carefully chosen bright colour helps define the character of the garden without costing a fortune. I always say that if the clients hate the colour I'll go back and repaint it myself - one day someone will take me up on this!

The planting and lighting have been designed and we're just waiting for Greg to finish so we can get on with these important finishing touches. I'm always disappointed when we get to the end of a project and don't have any budget left for the lighting. After all we spend so much of our time in this country inside looking out at our gardens it's a shame not to be able to see them.

The decorative lighting has been designed to brush over plants, skim up trees, graze down pergola posts and wash up over the surface of the walls and fences. Although these lights will also provide an amount of ambient light, there are some strategically placed lights that can be switched on to give higher light levels when needed.

I've ordered some fab planters from Livingreen Design and these will be stuffed with seasonal colour - bulbs for the spring, Agapanthus and Hemerocallis for the summer, as well as housing some climbers for the walls of the house and fences. I'll say more about the planting scheme once we get cracking with the planting.

If you need help with designing your garden please get in touch via my Web site, or email me at linsey@linseysgardens.com.

Sunday, 12 June 2011

How to design a garden

Garden design is not about being able to create a beautifully illustrated plan, although this is one of the many outputs of the garden design process. A garden designer’s role is to find creative, practical solutions to the many technical challenges presented by an outdoor space. A good garden designer can make a garden that is useable and suitable for a specific set of requirements as well as being beautiful and a pleasure to spend time in.

It would not be possible to tell you how to design a garden in a single article. I simply haven't got the space to explain about the correct ratio of mass to void, or how to create rhythm in a garden design, but I will outline what I consider to be the major steps in the garden design process.

1. Decide how you want to use the garden

Before you start thinking about how the garden will look, you need to decide how you want to use the garden. Ask yourself the following questions: how much time you’ve got to look after the garden, have you got any pets or children, do you have elderly visitors or relatives, do you have mobility problems, do you like gardening, do you enjoy spending time outside, do you like to eat and entertain outside, have you got loads of friends and family? The aim is to arrive at a list of requirements which forms the basis of the design process.

2. Do some research

If you are new to gardens, get inspired and find out what you like before you start thinking about your specific garden design. Visit some gardens, look in gardening books and magazines, go to some RHS shows like Chelsea Flower Show and Hampton Court Flower Show and look at the show gardens.

Experienced garden designers know the value of regularly looking at all forms of art and architecture in order to keep ‘visual vocabulary’ up to date and get inspiration for their designs.

2. Take the site survey

Take a thorough site survey and analysis. Measure the house including the position and height of all doors and windows. The survey should show steps, drains, manhole covers, chimney breasts, and anything else that will affect the final garden design.

Use triangulation and offsetting to plot in the boundaries of the garden, and the location of all plants, garden features and buildings. Make a note of things outside the garden like overhanging trees – they will affect the eventual design of the garden. Survey any level changes in the garden and mark these clearly on the survey.

Taking a soil sample for analysis – it’s important when planting to know what type of soil you have. Note down boggy places and other potentially troublesome parts of the garden. Look beyond the garden boundaries and see if there are any views or features that you can use as part of the new design – this is called ‘borrowing’ the view.


Draw up the site survey to scale, in ink on a piece of tracing paper large enough to allow you to set out the new design and put in labels.

3. Create the new design

Using your requirements and site survey create the new design using a series of interconnected geometric shapes. The final design should create a pleasing picture on paper and each element that comprises the design should be the correct size for its intended purpose. For example, if you want to seat 6 people on your terrace make sure it’s large enough to hold a table of the correct size with room to pull out chairs so that people can sit down and stand up comfortably.

Make sure your design addresses any sloping parts of the garden. If you want flat spaces and your site is sloping you will need to put in retaining walls – make sure these are clearly shown on the plan.

Draw up the design to scale in ink on a piece of tracing paper. Label everything clearly including wall heights, paved areas, lawn, edgings, pergolas, planted areas, walls with their heights, water features.

4. Choose construction materials

Select materials for constructing each area and make sure these are labeled on the plan. There are many different construction materials available and these will vary greatly in price and quality, for example, paving slabs come in all different types of stone and man made materials. Do some research around local DIY stores, garden centres, and building suppliers to find materials that suit your purpose, look great and fit your budget.

5. Create the planting plan

For each planted area in the garden draw up a planting plan with a mixture of evergreen and deciduous shrubs, herbaceous plants and bulbs that will give a year-round display of colour and scent. The plants give the garden structure and that important quality of seasonal change.

6. Create the construction plan

This a technical drawing that shows your contractors how to construct specific features in the garden such as steps and retaining walls. It can also contain details of required paving patterns and sections showing how paving is to be laid.

7. Create the setting out plan

This plan makes landscape contractors lives easy by giving measurements that show the dimensions and location of all features in the garden. For example, if you have a circular seating area somewhere in your garden design scheme you can show its diameter and the location of the centre of the circle from some fixed point (usually the house). This removes any potential measuring errors.

If you need help with designing your garden please get in touch via my Web site, or email me at linsey@linseysgardens.com.

Friday, 3 June 2011

Steeply Sloping Garden Design in Gerrards Cross - Finished!

This steeply sloped garden in Gerrards Cross is finally complete and I'm really proud of it.


The fab contractors, Manor Landscapes, battled with appalling winter weather and horrible access issues and they've done an amazing job. So, thanks very much to Chris, Paul, Geoff, Tom and others who's names I've forgotten.


The plants are in and all but one tiny section of the wall is painted - see if you can spot it! I won the battle to get the walls painted pink and everyone loves it including Geoff (ha!).


The lower terrace is enclosed on three sides by rendered blockwork walls which also form the retaining walls for the first level of raised planting. There is a herb garden who's retaining wall functions as an informal seat adjacent to the chunky pergola which screens the BBQ area. This terrace is split into two levels simply for practical purposes - there were some manhole covers the height of which could not be changed and their height dictated a different finished height of paving in the two areas.

This terrace is large enough to two sizeable rattan sofas and a large dining table. It has a contemporary, formal feel, it is sheltered and has a really nice sense of enclosure and privacy. A large patio area was one of the main requirements and the clients are delighted with their new outdoor room.


Another key requirement was a large, flat lawn on the upper terrace. This is the area where the evening sun sets and the clients wanted a place where their grandchildren could play and they could sit and enjoy the last of the sunshine.

The new lawn was created on the top terrace and is enclosed by a Hornbeam hedge, some scented climbers and a fan trained Garrya Elliptica. It is retained using railway sleepers which were used throughout the garden to keep the build costs down and minimise the impact of the large number of retaining walls required to create the garden. Planting and hard landscaping were deliberately kept to a minimum on the lawn terrace as the client specifically asked for a large, uninterrupted lawn area.


The pergola used to screen the BBQ area is deliberately chunky. It is never possible to completely block the view from an overlooking property - you would need to build a wall or fence as high as the house. The way it is done is by using bold structures and strong geometric shapes to stop the eye and focus attention inside the garden, giving the feeling of more seclusion.

The pergola was made from 150mm square timber uprights, with a 150mm square timber top frame. The top frame was notched to take the cross pieces and fixed to the top of the uprights with wooden pegs. The 150mm x 25mm cross pieces were also notched and then slotted into the top frame so that they fit flush into the structure. The whole pergola was painted black. It is softened by some planters with box balls and climbers that will grow up and partially cover the pergola. It is not intended that the plants will completely smother the pergola, I particularly want it's form to remain visible.


Steps lead from the patio terrace to the first raised level. Thereafter, I have used a winding ramp that leads up through planted borders to the top lawn level. The sides of the pathway are retained with railway sleepers and it is paved with one of my favourite garden construction materials - self-binding gravel.

Self-binding gravel is laid on top of a sub-base like paving, but it is simply whacked down and forms a semi-hard surface. You get some aggregate movement on the top of the path, giving that satisfying gravelly crunch. It is a natural looking material that provides a lovely contrasting texture to the hard paving and grass. It can be swept more easily than gravel and doen't spread around as much as loose aggregate.


Here are the other posts about this project which show the progress of the build from the start Introduction, Update 1, Update 2, Update 3

If you need help designing your garden please visit my Web site for all contact details.

Wednesday, 1 June 2011

Garden Design Ideas - Small Shallow Garden - Update 2

The build for this small, shallow garden in Bracknell, Berkshire is well underway and can really get a sense of how the garden will feel when it's complete. Already, there is a greater sense of enclosure and you can see how different parts of the garden will be used. This design shows that it is possible to create an uncluttered, small garden with distinct areas which each have a different atmosphere and function.


The retaining walls for the raised borders are all in place and waiting for a coat of render, or cladding. I'm just mulling over what colour to paint the walls. It will definitely be a colour, I'm just not decided on which one yet. I shall go and retrieve my paint charts and colour swatches and examine them over a cup of tea later.


The paving has arrived and is being laid. I have chosen this silver blue which I use a lot as it goes well with almost any brick colour and helps to create a clean, crisp finish.


The walls of the barbeque enclosure are also nearly finished. This is just an alcove for the barbeque to slide into with peripheral cupboards. It's a very neat solution (if I say so myself) to storing the barbeque which often ends up standing folornly on the patio looking rather untidy. The two cupboards will be finished with a slab which will be sealed and function as worktops, turning a storage area into an outdoor kitchen.


The pergola over the shady seating area is due to go in next. Metal pins have been mortared into the footings for the retaining wall around the seating area, these are to hold in place the chunky 150mm square uprights. The retaining walls will be constructed around the uprights. The whole structure will be painted black, as will all other wood in the garden.


I am currently working on the lighting plan and planting plan for this garden, more of that in the next update.

If you need help designing your garden please visit my Web site for all contact details.

Wednesday, 18 May 2011

Garden Design Ideas - Small Shallow Garden - Update 1

The build has now started on this small garden in Warfield, Bracknell, Berkshire. The garden is small and shallow and a great challenge for a garden designer.

The saying goes that you have to break a few eggs to make an omlette and this is my garden design equivalent. The garden has been completely cleared to create a blank canvas for my new contemporary design.


The garden gets very boggy due to heavily compacted clay soil and an underground stream. To combat this, drains under the lawn will be channeled into a massive central soakaway.


Footings for the raised beds that will enclose the perimeter of the garden have already been excavated and concreted. These raised borders will give immediate height to the planting, and enclose the garden with a strong geometric structure giving personality to this rather featureless space.


The paved areas have been set out and are about to be excavated. They will then receive their 75mm sub-base of MOT Type 1 hardcore (scalpings). In places where some rather soggy blue clay has been found we are digging down a little deeper for the sub-base to ensure a really firm foundation for the paving.


Next week the garden will really start to take shape when the walls go up. The retaing walls that form the pergola seating area and curved grass alcove will be faced with this lovely slate cladding. The rest of the walls will be rendered and painted.


Have a look at this previous post to see the before photos and garden design plans.

If you need help designing your garden please visit my Web site for all contact details.

Tuesday, 29 March 2011

Case study - large, long garden in Caversham, Reading, Berkshire

This long garden in Caversham, Berkshire is one-third of an acre, backs onto a golf course and has great views over the surrounding countryside. The clients wanted to preserve the views and keep the garden natural. The garden attracts a variety of wildlife which the clients enjoy and want to encourage. The idea is to create a new garden where nature and people can live stylishly side-by-side. The clients had employed an architect to design an extension and therefore appreciate fully the benefits of working with garden designer on the outside space – what a nice change!


The requirements included a herb garden between an existing summer house and shed, a paved area outside the summer house and planting to help integrate it into the garden. The existing patio was to be extended and the original gateposts, complete with decades of lichen, at the bottom of the garden were to be kept and incorporated into the design. Three ancient apple trees were to be retained and added to if possible. The greenhouse was to stay along with the Fig tree that lives behind it. At the front of the house a new driveway and front entrance to make the front garden more practical and beautiful were required.


I love flint, I was born and raised in Buckinghamshire where it is used everywhere. In this garden all retaining walls are faced with flint and stone. Flint is not only a beautiful construction material; it is widely used in this area as there was a huge flint quarry in Reading. I am going to use Limestone blocks as a frame for flint panels in all the walls. This will blend the garden in with local architecture and look stunning.


I really wanted break the garden up into different areas and give it more personality, impact and a sense of drama. The challenge was to do this without using too much hard landscaping. The new design uses a series of circles that delineate the transitions through the garden and mark out different areas. The circles are linked by 45 degree angle straight lines and asymmetric curves, which combine to give the garden a sense of movement and rhythym, a strong shape that directs attention inwards to various focal points, and also allows the eye to travel to the view beyond the gate.

There are grass paths entered and exited via Hornbeam arches and bounded by Hornbeam hedges. Hornbeam (Carpinus betulus) is one of my favourite hedging plants. It’s tougher and more drought tolerant than Beech, but looks very similar. Hornbeam (like Beech) holds its dead leaves in winter and they make a lovely rustling sound when moved by the wind.


A sunken seating area at the bottom of the garden with built in seats and a fire pit at its centre will provide a sheltered area for a meal or a glass of wine at night. This area will be sunk 45cm below finished lawn level and accessed by three shallow steps. The retaining walls have a circular tower at one end; one wall has its tower at the entrance and the other at the exit. Each tower will be topped with a copper bowl and water will bubble up through the centre of the bowl. Bronze bio-ethanol torches will be placed opposite each entrance/exit tower. Retaining walls and towers will be faced with stone and flint. The outside face of the retaining walls will be finished with a turf mound to blend it into the landscape. These turf structures also give a natural, sculptural finish to this structure and blend it into the overall aesthetic of the garden.


Either side of the existing gateposts at the bottom of the garden there will be a raised bed 60cm high. The retaining walls will be faced with Limestone and flint.

Between the summer house and shed is a small, formal herb garden accessed through a simple wooden arch and screened with trellis panels. The paving in this area is self binding gravel and the beds are finished with a granite sett edging.

The shed is screened by a low wall 45cm high topped with a bespoke screen of 150mm x 25mm wooden planks set at an angle like a large Venetian blind. The wall will be faced with stone and flint. The redundant area to the rear of the shed and summer house will be cleared and widened to provide space and screening for compost bins and water butts.

The shapes from the rear garden are echoed in the front garden. More parking space and kerb appeal is provided by a gorgeous resin bonded gravel driveway. Planting and a new hedge along the front boundary will soften the new driveway. All planted areas are edged with black granite setts. A 60cm high stone and flint faced wall will form the boundary running up to the garage to give the front garden a more elegant look and tie in with the architecture of the rear garden. The front gatepost will be moved to widen the entrance. The gatepost will be faced with stone and flint. The front step and threshold will be paved with traditional Victorian tiles, an echo back to the original period of the house.


If you need help designing your garden please get in touch. You can email me at linsey@linseysgardens.com, all other contact details are on my Web site.

Friday, 18 February 2011

Steeply sloping garden in Gerrards Cross - Update 3

The garden in Gerrards Cross is nearly finished, but the 80/20 rule is coming into effect very strongly and slowing things down. This rule states that the last 20% of the work will take 80% of the time, grrrrrrr!

The guys from Manor Landscapes have been trying to render the lower blockwork walls since before Christmas. First there was the snow and ice which stopped them from even attempting to render. Now there is the rain and general soggyness which is preventing the render going off (setting) and it's really slowing everything down. Wet weather also makes pointing the paving very difficult.

However, you can see how near completion we are from these photos. Here is a shot from the top of the garden showing the lovely, large terrace – one of the main requirements from the client. The terrace area has a completely different feel to the rest of the garden.


The small pergola is slmost complete. The chunky posts will soon have an open top and it will be clothed with climbing plants. The purpose of this pergola is to provide screening for outdoor cooking, it helps with privacy in this area which is overlooked by neighbouring houses.


The route up the garden is via a gently sloping self-binding gravel pathway. The sub-base is down for the path and the next step is to lay a membrane and compact the self-binding gravel on top. This will be done as one of the last tasks of the build. Steps lead up to the pathway from the lower terrace area.


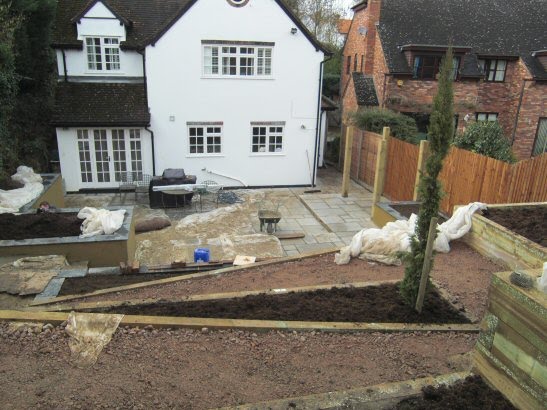
Ideally all retaining walls would have been constructed from blockwork but in order to keep the costs down the upper terraces of the garden have been created using railway sleepers. Whilst these upper walls look a little dominating at the moment, once the planting goes in they will be softened. We have already planted the Cupressus on the end of the two horizontal borders separating the self-binding gravel path. No attempt will be made to cover entirely the retaining walls as they deliniate the shapes and structure of the garden and emphasise the horizontal elements.


Here are the other posts about this project which show the progress of the build from the start Introduction, Update 1, Update 2

If you'd like help designing your garden please visit my Web site for telephone contact details, or simply email me linsey@linseysgardens.com.